Friday, November 21, 2014

IxNetwork TestComposer: How to start stop traffic automatically

Setup:
2 ports back to back
port1 IP1=1.1.1.1
port2 IP2=1.1.1.2
2 traffic Items configured
"TrafficItem1 TCP" transmitted from port1 to port2
"TrafficItem2 UDP" transmitted from port1 to port2

      We would like to automatically start and stop all traffic items every 5 minutes.
In order to do this we will need to create a TestComposer  which  in an infinite loop will Start traffic, wait, stop traffic, wait, start again.

Configuration
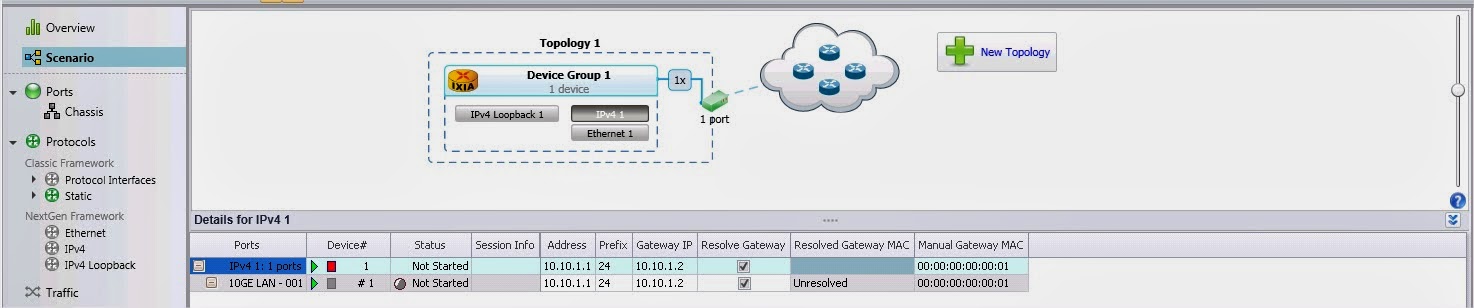
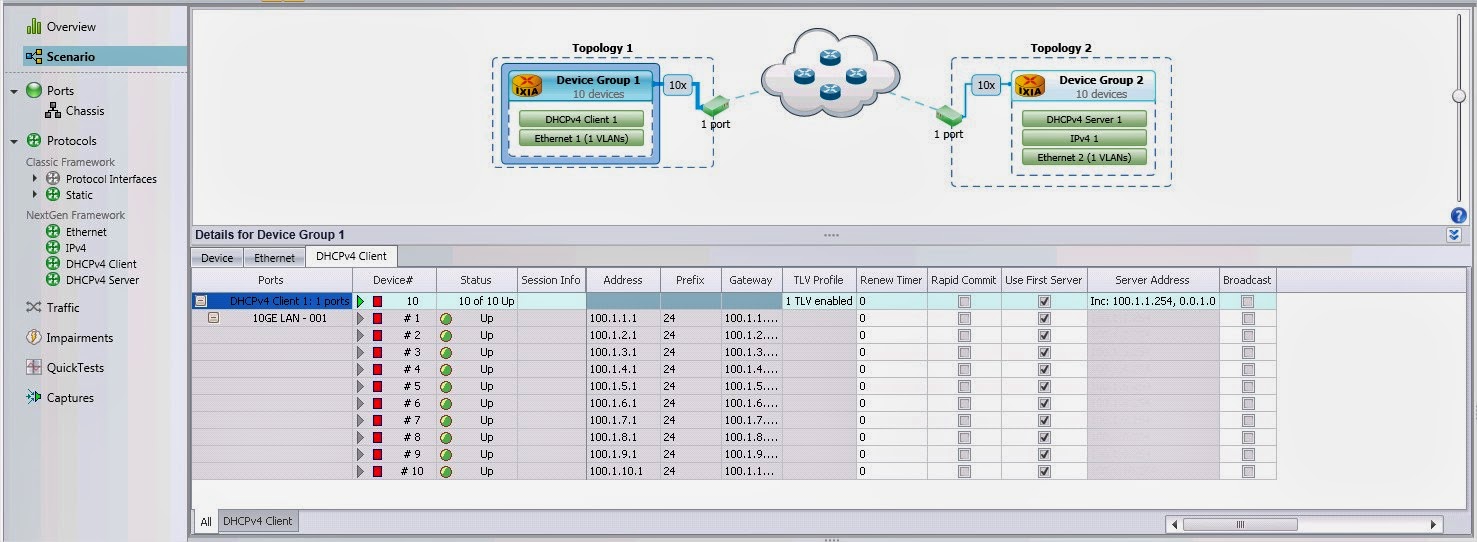
**We will consider that we already built the setup  which will look like this:

1. Enable the TestComposer View.
Go to View tab and select TestComposer View

2. Add a Start all Traffic Execute step
2.1 Right click on Main procedure window and and hose add Step

2.2  Double-click on Command String empty value and a small arrow will appear on the right of the cell from which you can select from available  commands


3. Add a 5 minutes sleep step

4. Add a Stop all Traffic Execture Step

5. Add a 5 minute sleep step again

6. Include all this steps in an Infinite While
6.1  Select all commands right click  and chose to insert them in a While Loop

6.2 Set the conditional  expression to True

 7. Start the script  from the Play button from Main ribbon


If you plan to run the testcomposer for more than 2 day I suggest to  save the configuration and open it from IxNetwork TCL Server.


IxNetwork TCL server will look like a normal GUI and will  be available in TaskBar  and as long as you don't have it open on the screen it will not consume so much runtime memory as the normal GUI.
The normal GUI  consumes resource even if its minimized.


Wednesday, May 14, 2014

IxNetwork Traffic: Create Traffic Item from a Wireshark packet

Scenario:
You  need to  generate traffic with some particular type of packets and you already have one captured as example.

Configuration:
1. Open offline capture
1.a On IxNetwork go to Capture  tree and chose Open Capture from main ribbon and select the capture file


1.b The capture  will be added to Offline capture in IxNetwork

1.c Click on the capture name and capture will be automatically open with Wireshark
   
2. Create Traffic item
2.a On Wireshark  right click on the packet  yuo want to  use and chose option Create IxNetwork traffic Item

2.b Chose the Endpoints for the Traffic Item

2.c Verify that fields were completed automatically


*** You cannot create traffic items from more packets . Each packet  that you want to  use  as traffic item needs to be converted one at a time

IxNetwork Traffic: How to create ARP storm

Scenario:
Send ARP request from 100 different devices ( IP 100.0.0.2+100 ) to IP 100.0.0.1

Configuration:
1. Create a RAW stream  between port 1 and port 2

2. Configure the Ethernet settings of the traffic stream
2.a Set destination address as Broadcast address

2.b Set Source MAC as 00:00:01:00:00:01 incremental  , count 100.

3. Add the ARP header inside the Ethernet payload
3.aClick on Ethernet Payload and then on button Add protocol to frame

3.b Select Ethernen ARP

3.c Set Sender Hardware Address to matche the Source MAC adress


3.d Set the Sender Protocol Address to 100.0.0.2+100

3.e Set the Target Protocol Address to  100.0.0.1 


3.f  Make sure frame size is set to 64B


***The end result should look like this:


***For real  ARP controll traffic do not enable any flow tracking  on  the Traffic Item.
The flow tracking add some extra signature/timestamp bits inside the packets that are used for statistics.
If you  want to see statistics  of the  traffic item enable flow tracking, I suggest on MAC source as bellow. The frame size  might  automatically modified also.


IxNetwork: How to compare 2 configuration Files


Use Resource Manager compare button


3rd party application available: Kompare or WinMerge

Friday, May 9, 2014

IxNetwork NGPF: Configure 2 BGP peers and run traffic to prefix list

Scenario:
Configure a eBGP session  between  2  peers that are running BGP over their loopback interface. 
Inject a prefix list  in BGP and run traffic to it from the  neighbour.


Create a BGP peer:
1. Create a topology having one device group with Protocol IPv4 and IPv4 loobback enable

2.Configure interface IP

3. Configure  IPv4 loopback address

4.  Add protocol over IPv4 loopbak  interface

4.a Select BGP  over Ipv4 loopback address

5. Configure BGP

5.a  Enable filter IPv4 unicast on Learned routes Filter  if you want to see the learned routes in real time


Advertise routes:
6. Add a network group over BGP

6.a Chose Network group type a prefix

6.b Configure the prefix

*** repeat  the first 5 steps for  the second BGP peer

Start scenario
7. Check that routes are advertised using statistics
8. Check the learned routes on the BGP peer
8.a On the peer that is receiving the routes right click on the peer and select Get IPv4 Learned info

8.b Check that all routes are displayed


Send traffic from  Device 2 physical interface 10.10.1.2 to  all prefixes  advertised by its BGP peer

9.a Set the source address as 10.1.1.2

9.b Set the destination address as the prefix list

9.c Enable flow tracking on  IP Destination  Address so you can check that all prefixes are served
9.d Check the flows in Preview 

9.e Start traffic and on Traffic Item tab drill down per destination IP


Thursday, May 8, 2014

IxNetwork NGPF: DHCP example configuration with traffic

Scenario:
Use 2 ports back to back
Configure 1000 DHCP clients each 100  in the same VLAN and  10 DHCP server, one in each vlan. Send L2/3 Traffic from client to his server


We are going to start the configuration by adding just 1 DHCP client in each VLAN

Configure DHCP clients
1.a Go to Scenario and add a port in Topology1


1.b Enable DHCP client on  the port and click finish


1.c Automatically a   Device group containing 10 instances ( default) will appear in topology


2. Go to Protocol Tree->Next Gen Framework subtree and click on Ethernet
  2.a From the master pattern ( blue raw)  enable VLAN


  2.b From master patter set the VLAN as incremental step 1


3. Go to Protocol Tree->Next Gen Framework subtree and click on DHCP client
3.a  From master pattern  configure Server Address as incremental


Configure DHCP server
1.a Go to Scenario and add a new topology


1.b Enable DHCP client on  the port and click finish


1.c Automatically a   Device group containing 10 instances ( default) will appear in topology


2. Go to Protocol Tree->Next Gen Framework subtree and click on Ethernet
  2.a From the master pattern ( blue raw)  enable VLAN and set the VLAN as incremental step 1


3. Go to Protocol Tree->Next Gen Framework subtree and click on IP
   3.a Set the DHCP servers IP addresses

4. Go to Protocol Tree->Next Gen Framework subtree and click on DHCP server
   4.a  From master pattern  set the pool  initial value

   4.b From master pattern  set the pool  size

   4.c  From master pattern  set the pool   gateway


Start DHCP server


Start the DHCP  clients
All the DHCP  clients should obtain an IP address


Modify DHCP client configuration to map 1000 DHCP clients
*** stop the DHCP clients 
1. Modify the number of instances to 1000

2.a Go to Protocol Tree->Next Gen Framework subtree and click on Ethernet
       Change the VLAN ID pattern to Custom from Master raw

2.b Go to Protocol Tree->Next Gen Framework subtree and click on DHCP client
        From master pattern  configure Server Address as Custom


Start devices and check all are up


Create the Traffic
Configure a Traffic Item which sends traffic in each VLAN from the clients to the server
1. Open Add L2/3  traffic wizard
1.a On source side add 10 selection each containing 100 adresses

1.b On destination side add 10 selection  each containing 1 address

*** the selection are paired 1to1  in the order that they were added, for example Selection1 from source side will send traffic only to Selection1 on destination side and so on.

1.c Verify the pattern by  checking the flow groups in preview


2.Start traffic. Check that the load is distributed equally to the destination IP address
*** Enable tracking on IP destination when you create the Traffic Item in order to have this option