Wednesday, April 20, 2016

IxNetwork Traffic: Enable tracking based on the value of fragmentation D bit

Setup:
You have 2 ports  and you want to send traffic from port1 (IP:100.1.0.1) to port2( IP:100.1.0.2)
Your DUT is going to remark the fragment bit from May fragment (0) to Do Not Fragment (1)
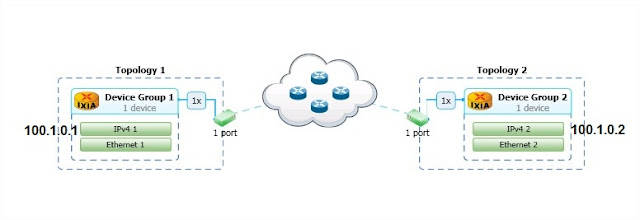


Configuration:
1. Create the topology as in the printscreen above
2. Create the Traffic Item
2.1 Select the proper Endpoints:


2.2 On Packet/QoS  window go to the packet structure and set the Fragment bit to May Fragment


2.3 On the same Packet/QoS window click on  the small field  next to fragment and choose to track it


2.4 On the Flow Tracking window enable Flow Tracking based on IPv4:Fragment


2.5 On the same Flow Tracking window Enable Egress Tracking and set Encapsulation to Any:Use Custom Settings


2.6 On The same Flow Tracking window set Offset to By Field and then press the button Select.
A new window will popup, look for field Fragment  Right click  and choose Default value 


Statistics verification
3.1 Start the Traffic Item
3.2 Go to Traffic Item Statistics tab, Right click on the Traffic Item line, choose Drill down per IngressEgress  Statistics-> Egress Fragment 


3.3 You will be switched to User defined stats and you will be able to see both initial ingress value and  the egress value ( in my case is 0 because there is no DUT to change that field in between )

Saturday, February 7, 2015

IxNetwork NGPF : IGMP configuration

Scenario:

port1: 1 IGMP querier
         IP=1.1.1.1/24, GW=1.1.1.100, IGMPv2
port2: 10 IGMP host
          IP-1=1.1.1.100, GW=1.1.1.1, IGMPv2, Group =225.0.0.1
          IP-2=1.1.1.101, GW=1.1.1.1, IGMPv2, Group=225.0.0.2
          -----
          IP-10=1.1.1.109, GW=1.1.1.1, IGMPv2, Group=225.0.0.9


 Configuration

1. Create IGMP querier topology
Open IxNetwork, click  on Scenario button and then on New Topology button.
Append a port to New Topology and click Next

In select protocols choose IGMP Querier and click Finish
*** Is not necessary to chose IP also, IxNetwork will know to create the proper stack

The Result topology will look like this:

***by default 10 devices are added in the topology
 Change the device multiplier to 1 so that  just one IP will be used

2. Configure the IP address:
Click on IPv4 1 layer in device group
On the master pattern ( blue line ) click on IP address and chose single value and set it 1.1.1.1

On the master patterm click on GW and chose single values 1.1.1.100

3. Configure the IGMP settings
*** IGMP setting are located on IGMP Querier 1 layer. For this example the default value will work fine


4. Create  one IGMP host topology
click on new topology button, append  port2 and select protocol Igmp Host

5. Configure the IP addresses
click on IPv4-2 layer to see the IP settings
on master pattern chose IP address pattern to be increment  starting 1.1.1.100

on master pattern chose GW address to be singular values 1.1.1.1

6. Configure IGMP settings
click on IGMP Host2 layer
On group address master pattern make it incremental startin 225.0.0.1

7. Start all protocols from main ribbon


When all devices are up they appear green.

Friday, November 21, 2014

IxNetwork TestComposer: How to start stop traffic automatically

Setup:
2 ports back to back
port1 IP1=1.1.1.1
port2 IP2=1.1.1.2
2 traffic Items configured
"TrafficItem1 TCP" transmitted from port1 to port2
"TrafficItem2 UDP" transmitted from port1 to port2

      We would like to automatically start and stop all traffic items every 5 minutes.
In order to do this we will need to create a TestComposer  which  in an infinite loop will Start traffic, wait, stop traffic, wait, start again.

Configuration
**We will consider that we already built the setup  which will look like this:

1. Enable the TestComposer View.
Go to View tab and select TestComposer View

2. Add a Start all Traffic Execute step
2.1 Right click on Main procedure window and and hose add Step

2.2  Double-click on Command String empty value and a small arrow will appear on the right of the cell from which you can select from available  commands


3. Add a 5 minutes sleep step

4. Add a Stop all Traffic Execture Step

5. Add a 5 minute sleep step again

6. Include all this steps in an Infinite While
6.1  Select all commands right click  and chose to insert them in a While Loop

6.2 Set the conditional  expression to True

 7. Start the script  from the Play button from Main ribbon


If you plan to run the testcomposer for more than 2 day I suggest to  save the configuration and open it from IxNetwork TCL Server.


IxNetwork TCL server will look like a normal GUI and will  be available in TaskBar  and as long as you don't have it open on the screen it will not consume so much runtime memory as the normal GUI.
The normal GUI  consumes resource even if its minimized.


Wednesday, May 14, 2014

IxNetwork Traffic: Create Traffic Item from a Wireshark packet

Scenario:
You  need to  generate traffic with some particular type of packets and you already have one captured as example.

Configuration:
1. Open offline capture
1.a On IxNetwork go to Capture  tree and chose Open Capture from main ribbon and select the capture file


1.b The capture  will be added to Offline capture in IxNetwork

1.c Click on the capture name and capture will be automatically open with Wireshark
   
2. Create Traffic item
2.a On Wireshark  right click on the packet  yuo want to  use and chose option Create IxNetwork traffic Item

2.b Chose the Endpoints for the Traffic Item

2.c Verify that fields were completed automatically


*** You cannot create traffic items from more packets . Each packet  that you want to  use  as traffic item needs to be converted one at a time

IxNetwork Traffic: How to create ARP storm

Scenario:
Send ARP request from 100 different devices ( IP 100.0.0.2+100 ) to IP 100.0.0.1

Configuration:
1. Create a RAW stream  between port 1 and port 2

2. Configure the Ethernet settings of the traffic stream
2.a Set destination address as Broadcast address

2.b Set Source MAC as 00:00:01:00:00:01 incremental  , count 100.

3. Add the ARP header inside the Ethernet payload
3.aClick on Ethernet Payload and then on button Add protocol to frame

3.b Select Ethernen ARP

3.c Set Sender Hardware Address to matche the Source MAC adress


3.d Set the Sender Protocol Address to 100.0.0.2+100

3.e Set the Target Protocol Address to  100.0.0.1 


3.f  Make sure frame size is set to 64B


***The end result should look like this:


***For real  ARP controll traffic do not enable any flow tracking  on  the Traffic Item.
The flow tracking add some extra signature/timestamp bits inside the packets that are used for statistics.
If you  want to see statistics  of the  traffic item enable flow tracking, I suggest on MAC source as bellow. The frame size  might  automatically modified also.


IxNetwork: How to compare 2 configuration Files


Use Resource Manager compare button


3rd party application available: Kompare or WinMerge